Try out
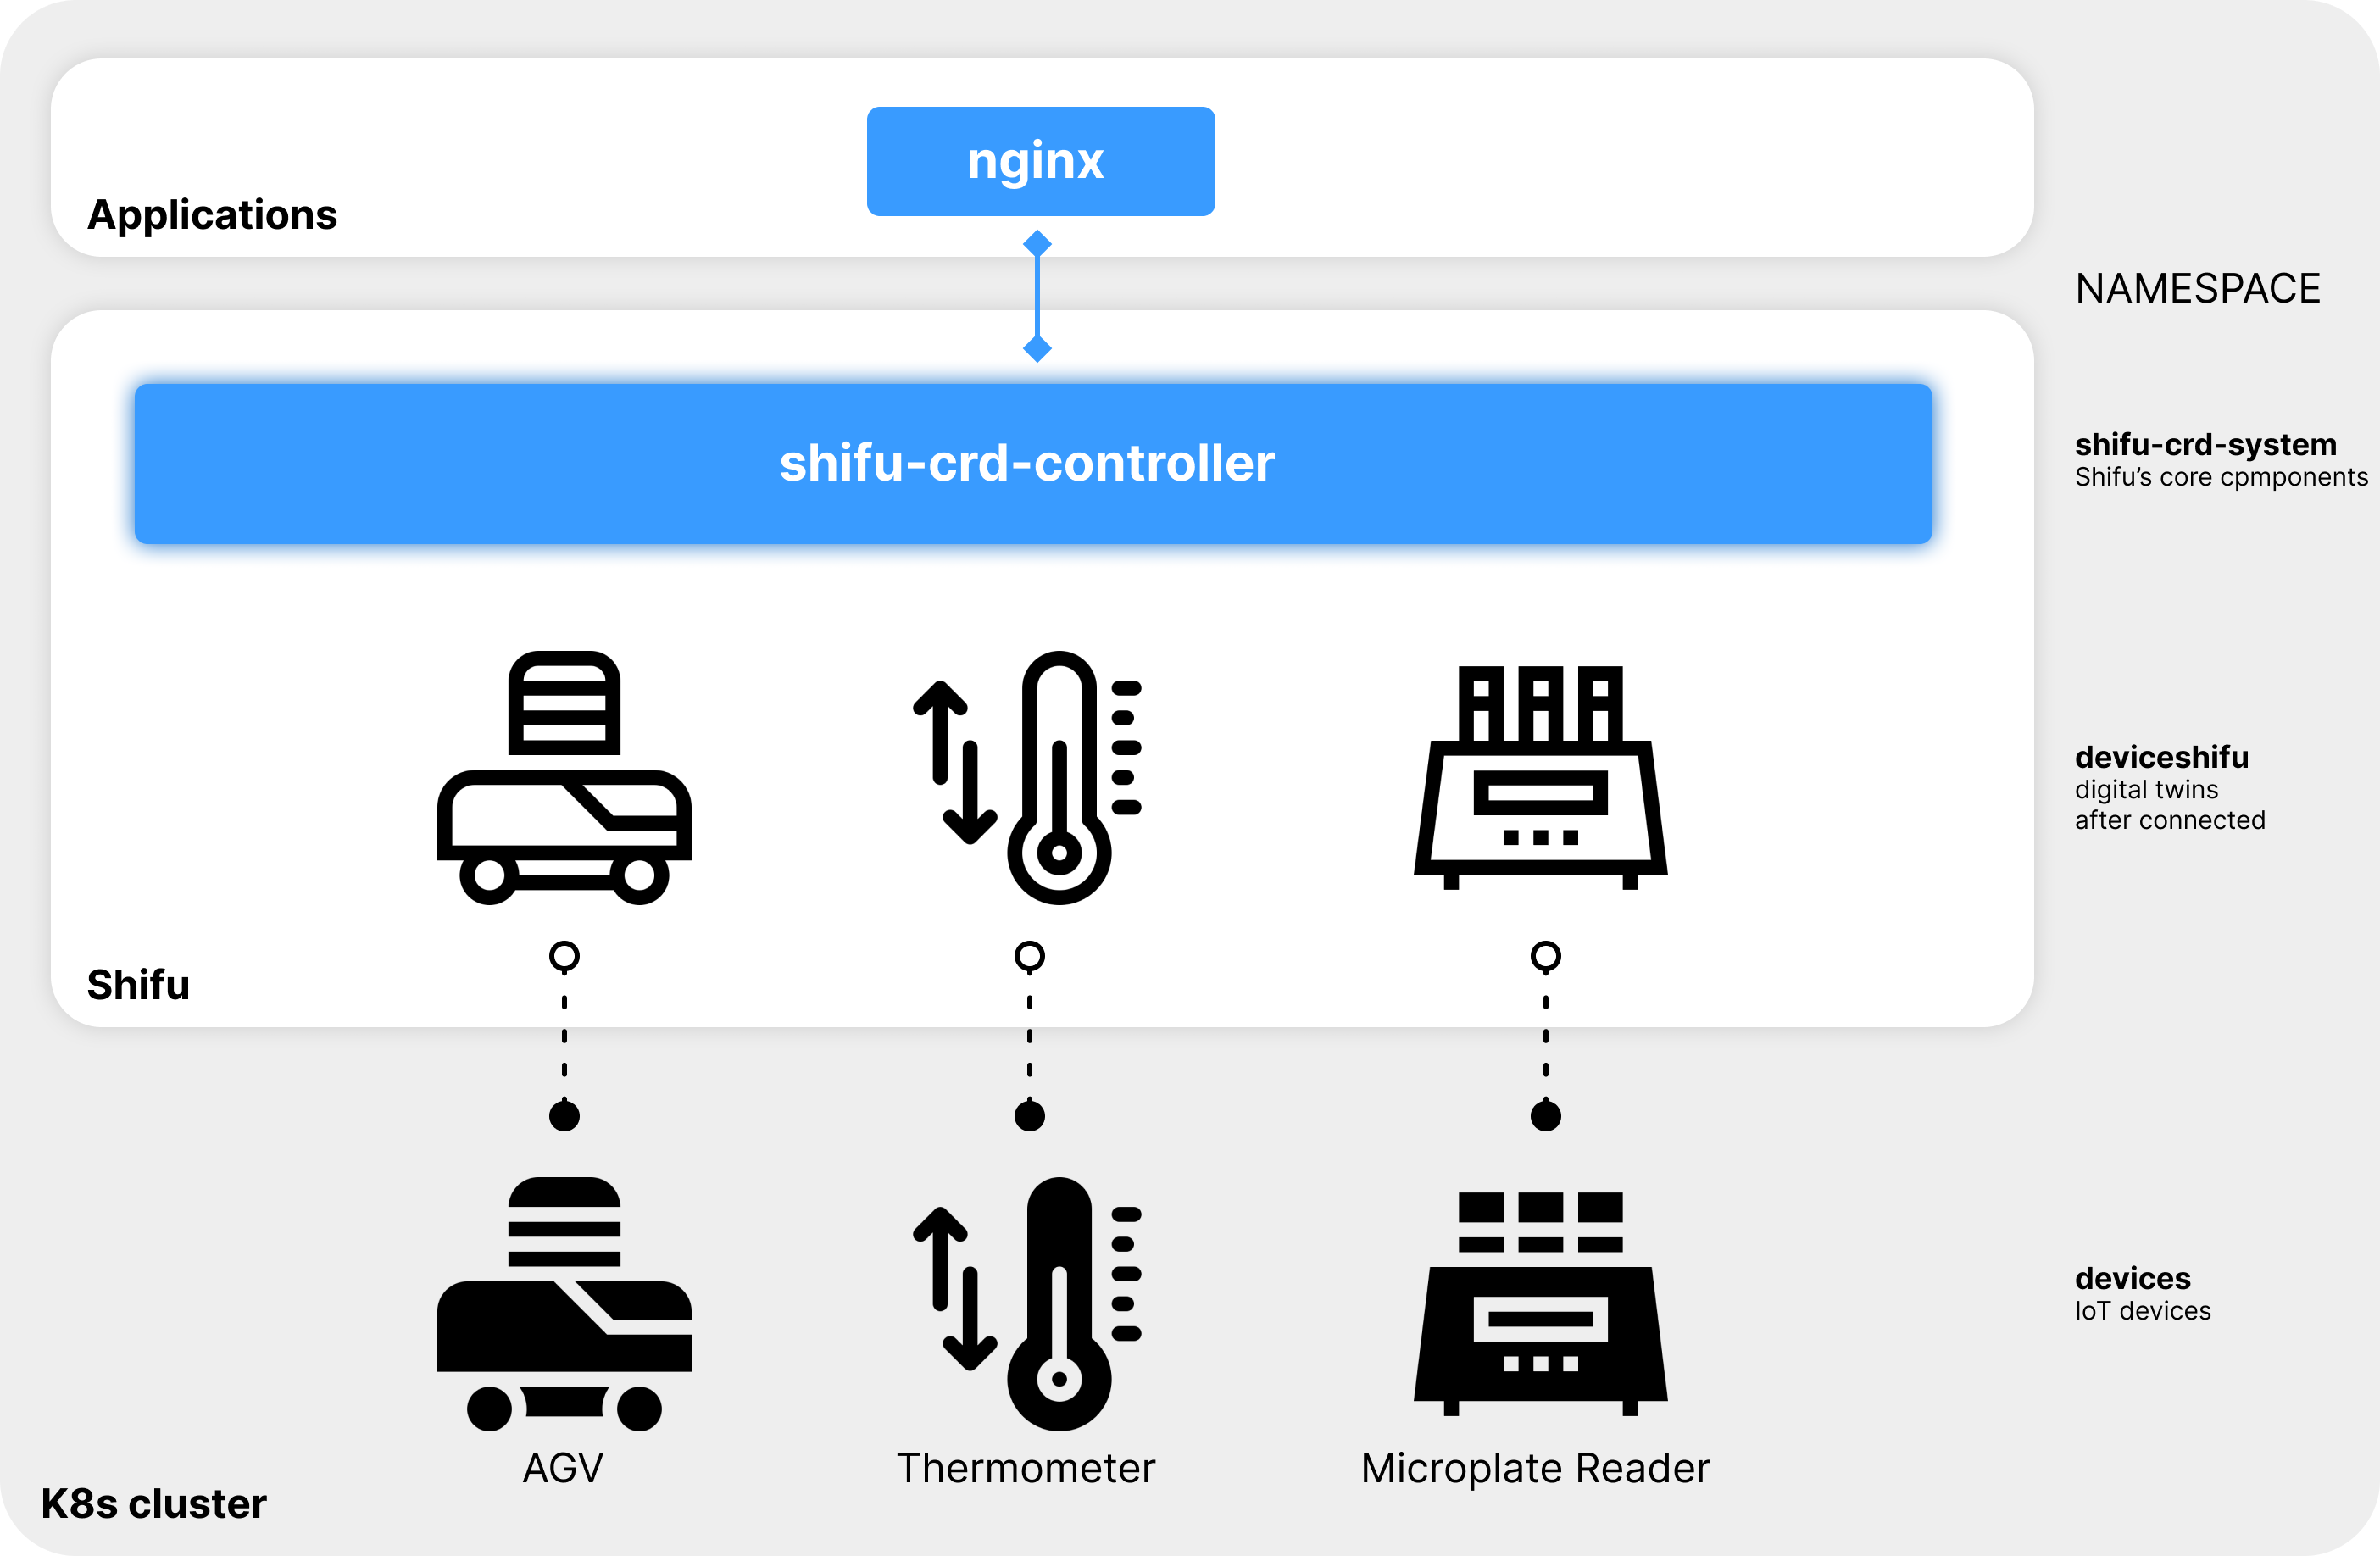
We have prepared five devices (AGV, thermometer, microplate reader, PLC and robotic arm) in Shifu installer for you to explore the abilities of Shifu.
An IoT device is a device that can connect and interact with other devices, systems, and applications offline or online, for instance:
- A robotic arm in a manufacturing plant can receive commands from a local automated control system and complete the corresponding moves.
- An automated guided vehicle can be remotely controlled by its operator.
- A thermometer in a car can send commands to the on-board air conditioner to raise or lower its temperature, and can upload real-time temperature data to the cloud.
When installing Shifu installer, five virtual devices are created and connected to your computer. Actual IoT devices can be operated through these virtual devices.
Preparation
To try out the devices mentioned below make sure to install Shifu in your local system from Quick Install before proceeding forward.
After the completion of Quick Install guide change the directory to shifudemos using:
cd shifudemos
Start nginx to interact with deviceShifu:
sudo kubectl run --image=nginx:1.21 nginx
sudo kubectl get pods -A | grep nginx
Now, nginx is running:
![]()
In the actual situation, users of IoT devices use an application or a monitoring platform to interact with the digital twin deviceShifu. Here nginx is an application or a monitoring platform.
1. Interact with the AGV
Details
Click here to view the details of AGV
Q: What is AGV?A: AGV is a kind of automatic guided transportation vehicle. (Please refer to specific introduction on Wiki)
Q: How does this interact with the AGV?
A: When the digital twin of the AGV receives the get_position command, it will generate and return the x and y axis coordinates of the current position of the device.
Create the digital twin
You have just installed Shifu through the Shifu installer, so the digital twin of the AGV, deviceShifu, has been created automatically. You can interact with the digital twin of the AGV directly without having to manually create it.
The state of the digital twin will show the state of the actual device, so operating the digital twin is actually operating the actual IoT device.
Execute the following command, and we can see that the digital twin of the AGV has started:
sudo kubectl get pods -A | grep agv
![]()

Interact with the digital twin
Next, enter the nginx:
sudo kubectl exec -it nginx -- bash
By interacting with the digital twin of the AGV via http://deviceshifu-agv.deviceshifu.svc.cluster.local, Shifu can get the x and y coordinates of the current position of the AGV:
curl http://deviceshifu-agv.deviceshifu.svc.cluster.local/get_position; echo
![]()
Press ctrl D to exit nginx.
2. Interact with the thermometer
Details
Click here for thermometer details
Q: How do I interact with a thermometer in this demo?A: When the thermometer's digital twin receives the read_value command, it will generate and return the current thermometer reading.
Create the digital twin
First, create a digital twin of the thermometer:
sudo kubectl apply -f run_dir/shifu/demo_device/edgedevice-thermometer
Now, the thermometer has started:
sudo kubectl get pods -A | grep thermometer
![]()

Interact with the digital twin
Next, enter the nginx:
sudo kubectl exec -it nginx -- bash
By interacting with the digital twin of the thermometer via http://deviceshifu-thermometer.deviceshifu.svc.cluster.local, Shifu can get the measured temperature of the thermometer (the following results are random):
curl http://deviceshifu-thermometer.deviceshifu.svc.cluster.local/read_value; echo
![]()
Finally, the current operating status of the thermometer can be obtained through the get_status command (the following results are random):
curl http://deviceshifu-thermometer.deviceshifu.svc.cluster.local/get_status; echo
![]()
curl http://deviceshifu-thermometer.deviceshifu.svc.cluster.local/get_status; echo
![]()
Press ctrl D to exit nginx.
3. Interact with the microplate reader
Details
Click here to view the details of the microplate reader
Q: What is a microplate reader?A: Microplate reader is a kind of laboratory equipment.(Please refer to specific introduction on Wiki)
Q: How do I interact with the microplate reader?
A: When the digital twin of the microplate reader receives the command get_measurement, it will return a matrix of 8*12. Each number in the matrix represents the value of the result of a spectral analysis scan in a sample.
Create the digital twin
First, start the digital twin of the microplate reader:
sudo kubectl apply -f run_dir/shifu/demo_device/edgedevice-plate-reader
Enter the following command to see that the digital twin of the microplate reader has been started:
sudo kubectl get pods -A | grep plate
![]()
Interact with the digital twin
Next, enter nginx: (if you have not started Nginx, please start the Nginx service first)
sudo kubectl exec -it nginx -- bash
By interacting with the digital twin of the microplate reader via http://deviceshifu-thermometer.deviceshifu.svc.cluster.local, Shifu can get the results of the microplate reader:
curl "deviceshifu-plate-reader.deviceshifu.svc.cluster.local/get_measurement"
Press ctrl D to exit nginx.
4. Interact with the PLC
Details
Click here to view PLC details
Q: What is PLC?A: PLC is an industrial controller. (Please refer to specific introduction on Wiki)
Q: How to interact with PLC?
A: When the PLC's digital twin receives the sendsinglebit command, it can modify a bit in the memory area. When it receives the getcontent command, it can get the value of a byte in the memory area.
Create the digital twin
First, start the digital twin of the PLC:
sudo kubectl apply -f run_dir/shifu/demo_device/edgedevice-plc
Enter the following command to see that the digital twin of the PLC has been started:
sudo kubectl get pods -A | grep plc
![]()

Interact with the digital twin
Next, please enter nginx: (if you have not started Nginx, please start the Nginx service first)
sudo kubectl exec -it nginx -- bash
By interacting with the PLC digital twin via http://deviceshifu-plc.deviceshifu.svc.cluster.local, Shifu can set bit 0 of the Q0 memory area of the PLC to 1:
curl "deviceshifu-plc.deviceshifu.svc.cluster.local/sendsinglebit?rootaddress=Q&address=0&start=0&digit=0&value=1"; echo
![]()
"digit" indicates the number of bits in the PLC memory and "value" indicates the value of the current bit. The value of the corresponding memory area bit can be changed by modifying the values of "digit" and "value". For example, the fourth digit value of the Q0 memory of a PLC represents the control program, and the program can be started by setting "digit=3" and "value=1":
curl "deviceshifu-plc.deviceshifu.svc.cluster.local/sendsinglebit?rootaddress=Q&address=0&start=0&digit=3&value=1"; echo
![]()
Press ctrl D to exit nginx.
5. Interact with the robotic arm
Details
Click here to view the details of the robotic arm
Q: What is a robotic arm?A: Robotic arm is a kind of industrial controller. (Please refer to specific introduction on Wiki)
Q: How do I interact with the robot arm?
A: When the digital twin of the robot arm receives the get_coordinate command, it will return its current x, y, z axis coordinates.
Create the digital twin
First, create a digital twin of the robotic arm:
sudo kubectl apply -f run_dir/shifu/demo_device/edgedevice-robot-arm
Enter the following command to see that the digital twin of the robotic arm has been started:
sudo kubectl get pods -A | grep robotarm
![]()

Interact with the digital twin
Next, enter nginx:
sudo kubectl exec -it nginx -- bash
By interacting with the digital twin of the robotic arm through http://deviceshifu-robotarm.deviceshifu.svc.cluster.local, Shifu can get the coordinates and operating states of the robotic arm (the following operating states appear randomly):
curl http://deviceshifu-robotarm.deviceshifu.svc.cluster.local/get_coordinate; echo
![]()
curl http://deviceshifu-robotarm.deviceshifu.svc.cluster.local/get_status; echo
![]()
curl http://deviceshifu-robotarm.deviceshifu.svc.cluster.local/get_status; echo
![]()
curl http://deviceshifu-robotarm.deviceshifu.svc.cluster.local/get_status; echo
![]()
6. Interact with the OPC UA Device
Details
Click here to view the details of the OPC UA
Q: What is a OPC UA?A: OPC UA is a machine-to-machine network transmission protocol applied to automation technology, please click here for details.
Q: How to interact with the OPC UA in this demo?
A: When the OPC UA digital twin receives the get_server command, it will get the OPC UA Server information, and when it receives the get_value command, it can get the value of a NodeId of the device.
Create the digital twin
First, create a digital twin of the OPC UA:
sudo kubectl apply -f run_dir/shifu/demo_device/edgedevice-opcua/mock-device
sudo kubectl wait --for=condition=Available deploy/mockdevice-opcua -n devices --timeout=150s
sudo kubectl apply -f run_dir/shifu/demo_device/edgedevice-opcua
Enter the following command to see that the digital twin of the OPC UA has been started:
sudo kubectl get pods -A | grep opcua
![]()
Interact with the digital twin
Next, enter nginx:
sudo kubectl exec -it nginx -- bash
By communicating with the digital twin of the OPC UA through http://deviceshifu-opcua.deviceshifu.svc.cluster.local, Shifu can get the information of OPC UA Server:
curl http://deviceshifu-opcua.deviceshifu.svc.cluster.local/get_server; echo
![]()
By communicating with the digital twin of the OPC UA through http://deviceshifu-opcua.deviceshifu.svc.cluster.local, Shifu can get the value of NodeId:
curl http://deviceshifu-opcua.deviceshifu.svc.cluster.local/get_value; echo
![]()
7. Interact with the Socket Device
Details
Click here to view the details of the Socket
Q: What is a Socket?A: Socket is an inter-process communication mechanism provided by the operating system, please click here for details.
Q: How to interact with the Socket in this demo?
A: When the socket's digital twin receives the cmd command, it parses the information about the requested load and returns the Command plus '\n' in it.
Create the digital twin
First, create a digital twin of the Socket:
sudo kubectl apply -f run_dir/shifu/demo_device/edgedevice-socket/mock-device
sudo kubectl wait --for=condition=Available deploy/mockdevice-socket -n devices --timeout=150s
sudo kubectl apply -f run_dir/shifu/demo_device/edgedevice-socket
Enter the following command to see that the digital twin of the Socket has been started:
sudo kubectl get pods -A | grep socket
![]()
Interact with the digital twin
Next, enter nginx:
sudo kubectl exec -it nginx -- bash
By communicating with the digital twin of the Socket through http://deviceshifu-socket.deviceshifu.svc.cluster.local, Shifu can get the command we sent:
curl -XPOST -H "Content-Type: application/json" -d '{"command": "testCommand", "timeout":1000}' \
http://deviceshifu-socket.deviceshifu.svc.cluster.local/cmd; echo
![]()
8. Interact with the MQTT Device (Support multi-topic subscription)
Details
Click here to view the details of the MQTT
Q: What is a MQTT?A: MQTT is a messaging protocol based on the publish/subscribe paradigm under the ISO standard, please click here for details.
Q: How to interact with the MQTT in this demo?
A: We support multi-topic subscription, so we can have multiple APIs for MQTT's digital twin (eg: get_topicmsg1, get_topicmsg2), When MQTT's digital twin receives the mqtt_data command, it returns the last message in the subscribed topic.
Create the digital twin
First, create a digital twin of the MQTT:
sudo kubectl apply -f run_dir/shifu/demo_device/edgedevice-mqtt/mosquitto.yaml
sudo kubectl wait --for=condition=Available deploy/mosquitto -n devices --timeout=150s
sudo kubectl apply -f run_dir/shifu/demo_device/edgedevice-mqtt
Enter the following command to see that the digital twin of the MQTT has been started:
sudo kubectl get pods -A
![]()
Interact with the digital twin
By communicating with the digital twin of the Socket through http://deviceshifu-mqtt.deviceshifu.svc.cluster.local, Shifu can get the command we sent:
sudo kubectl exec -it nginx -- curl http://deviceshifu-mqtt.deviceshifu.svc.cluster.local/get_topicmsg1
sudo kubectl exec -it nginx -- curl http://deviceshifu-mqtt.deviceshifu.svc.cluster.local/get_topicmsg2
![]()
![]()
We can use mosquitto to publish data to multiple topics to MQTT server. (The data after -m is the information we posted)
sudo kubectl exec -it deploy/mosquitto -n devices -- mosquitto_pub -h localhost -d -p 1883 -t /test/test1 -m "test_topicmsg1"
sudo kubectl exec -it deploy/mosquitto -n devices -- mosquitto_pub -h localhost -d -p 1883 -t /test/test2 -m "test_topicmsg2"


At this point we can send commands to the digital twin of MQTT to get the published data.
sudo kubectl exec -it nginx -- curl http://deviceshifu-mqtt.deviceshifu.svc.cluster.local/get_topicmsg1
sudo kubectl exec -it nginx -- curl http://deviceshifu-mqtt.deviceshifu.svc.cluster.local/get_topicmsg2
![]()
![]()
At the same time, we can use the following commands to publish data to multiple topics through the digital twin of MQTT. (The data after -d is the information we posted)
sudo kubectl exec -it nginx -- curl -X POST -d 'test_pulish_topic1' http://deviceshifu-mqtt.deviceshifu.svc.cluster.local/get_topicmsg1
sudo kubectl exec -it nginx -- curl -X POST -d 'test_pulish_topic2' http://deviceshifu-mqtt.deviceshifu.svc.cluster.local/get_topicmsg2
Next Step
Congratulations!!!🚀 🚀 🚀 You have completed trying Shifu, next:
- You can check the left sidebar for
- How-to Guides: Detailed guides for using Shifu.
- Reference Book
- Shifu architecture and functions.
- Shifu API reference.
- Open Source Community: View FAQs, get support, and join the open source community.
- Shifu is now an open source project. If you are interested in it, visit Shifu's repo at GitHub.
- Contact us to get technical support。
Delete the cluster (optional)
During the process of trying Shifu, the Shifu installer created a cluster on your computer and installed Shifu in this cluster. If you do not want this cluster to run continuously, you can delete this cluster by executing the following command:
sudo kind delete cluster
Docker images can also be deleted. Use command sudo docker images to check all images. You can use command sudo docker rmi <image_id> to delete useless images.
Used images:
kindest/nodeto create a local clusteredgehub/deviceshifu-http-xxxxto generate a deviceShifu on the base of itedgehub/mockdevice-xxxvirtual devicesedgehub/shifu-controller-telemetry-plugina Shifu plug-inedgehub/shifu-controlleredgehub/edgedevice-controller-multiShifu's controllernginxto interact with deviceShifu
Delete the downloaded Shifu installer shifu_demo_aio_xxx_xxx.tar and the folder testdir.
You can also check more detailed instruction in Update, Uninstall and Restore Demo.